Pages

Monday, 4 February 2013

Mini Caramel Lattes with Homemade Syrup

012I’m not a latte girl. I prefer a medium strength, boring filter coffee or Americano with a splash of skimmed milk. Before Christmas, however, I noticed that one of those ‘everywhere’ high street coffee shops (we, unfortunately, have very few little independent ones near us) were selling a Salted Caramel Latte. It was cold outside, I was shattered, me and the little one needed a rest, so I stopped  and I promptly ordered one. It was delicious and soon, whenever I passed one of these shops in town, I couldn't walk past without buying. When you total the cost and, not to mention, the calories of all those lattes, I decided there must be a better way to drink your coffee. But Christmas has now come and gone, the weather has turned a little milder, and I still hanker after the sweet salted caramel fix.

It was with the thought of saving money in mind that I then trawled the net to find the perfect homemade syrup idea. I found two main ones: the first being a sugar / water caramel syrup mix; the second being a basic salted caramel using cream and butter. Now it was decision time. Did I opt for the rich and creamy salted caramel, or a more simple syrup? Deciding that the closet to what I enjoyed in the coffee shops was a syrup, I chose that version. I could always add cream on top after, although that sort of defeats the point of being able to control your calorie intake!

I chose this recipe, a simple combination of 2 US cups (450g) white sugar, 0.3 US cups (66g) brown sugar and 2 US cups (473ml) of warm tap water. Tip everything, along with some vanilla essence and the scraped inside of a pod, into a pan, mix and simmer gently for 10-15 minutes. When cool, pour into a sealable bottle.

011

To make the latte, tip a small amount, (1-2 tbsp) syrup into the bottom of a cup. Add a small espresso and top with milk. To make it even easier, use instant coffee in hot milk and add to the syrup. If you want a lower calorie version, make a ‘mini’ latte, use skimmed milk and don’t add whipped cream to the top, although I must say, this gives a lovely topping through which to drink.

I felt the syrup was a little thin, even after cooling, so I couldn’t use it to drizzle over the top of the cream, Next time, I’d use maybe three quarters of the water and add more if it was becoming too thick. That or rapidly boil for a short amount of time to help it thicken.

After all of that, I noticed (as you may have too) that I forget to ‘salted’ part to this drink. Well, it seemed to be one or the other – a plain syrup, or a salted caramel which would possibly be the wrong consistency to add to coffee, and doesn’t last as long in the fridge. A small sprinkle of salt over the top of the syrup would definitely do the trick though, just don’t overdo it!

Friday, 4 January 2013

Hummus New Year

044Firstly, Happy New Year to everyone. Whether you’ve decided it’s going to be a better year than last, take up something new, or simply enjoy every day, I hope it proves healthy and happy. Every year, people make lists of things to accomplish in the forthcoming months. I rarely bother, mainly as I know I’ll enjoy doing the things I enjoy and if I want to do something, I’ll do it, whether its on a list or not.

So, in my head only as I cannot commit them to paper, I am hoping to continue the blog with a little more regularity (I’m sure I said this last year too, but that sort of proves my point!) and get back into the veg. plot, with a little help from Frankie now she’s old enough not to eat the soil!

The first post of the year is Hummus, or however you choose to spell it. This is something I’ve only recently got into so I thought it might be more fun to make it from scratch rather than use the shop bought variety. Especially since it’s something my little one loves and making it myself gives me more control over the quantities of things like added salt. I searched online and found a huge array of recipes based on the basics of combining chick peas with tahini, lemon, garlic and salt. Two main articles inspired me though, and I based my recipe on Helen’s version.

One of the main tricks I gleaned was to remove the skins from the chickpeas to ensure a smooth dip. Now, this seemed like a good idea until I began, whereupon the enormity of skinning 500g worth of the little suckers seemed a little overwhelming! I chose to skin them after about an hour's soaking, rather than after cooking them and this worked well when it came to the speed of boiling them to soften. After a couple of hours, however, and a quick trick of popping a few handfuls into a dry tea towel and rubbing vigorously, they were done. I returned them to soak and went to bed!

When boiling, do as suggested and after ten minutes, remove the ‘scum’ from the pan, rinse, refill with fresh water and continue boiling. I also popped in a little bicarbonate of soda to help the mushability factor. Once soft, it really is simply a case of adding everything to your desired taste and spooning in a little of the cooking water to let it down. I chose to top mine simply with olive oil and paprika.

039

One was with crispy onions…

041

…and another with roasted red pepper.

040

The leftover chick peas were frozen with a little of the cooking liquid to use later. Apart from the skinning of the peas, it really was easy. And the dips are remarkably tasty, but then I did add extra garlic as suggested by @joeleshark! Thanks cuz. 

038

Monday, 26 November 2012

Smoky Avocado Salsa topped White Fish

DSC_0212

I was inspired to invent this salsa when Oxo sent out a blogger challenge to use their new 3 in 1 avocado slicer which splits, pits and slices the avocado. The OH is always asking to have more avocado, and I can never think of anything to do with it, except use it in a warm bacon and potato salad. So this challenge actually made me think a little harder than usual. As you can see, I’ve kept the smoky bacon aspect, but added a paprika twist.

Smoked Avocado Salsa topped White Fish

Ingredients: (feel free to alter the quantities according to taste)

1 large avocado

5 cherry tomatoes, cut into small chunks

100g smoked lardons

1/2 tsp smoked paprika

handful fresh chopped coriander

lemon juice

extra virgin olive oil

white fish

Method:

Oven-bake your white fish with a little oil and a squeeze of lemon.

Meanwhile, fry off the lardons until browned.

Sprinkle the paprika over the lardons, stir it in, remove from the heat and add the chopped tomatoes and half of the coriander. Squeeze some lemon juice over the top. Set aside.

Peel, pit and chop your avocado.

Oxo 3 in 1

Mix into the warm lardons mixture, add a glug of extra virgin olive oil and the rest of the coriander. Season to taste.

Remove fish from oven and spoon over the smoked avocado salsa.

DSC_0219

That’s it…simple. And made much easier by the new slicer thingumajig. It might even help me use avocados more often now I don’t get all the messiness!

DSC_0218

Monday, 19 November 2012

Abra-ca-Debora Pancake Supper

DSC_0221

I’m always on the look out for new ideas and quick and easy supper recipes, so was eager to get started when these pancakes arrived on my doorstep, along with a few other items to get started. I had, however, already chosen how I was going to use them.

DSC_0196

The savoury pancakes would be used as a receptacle for Tartiflette, the sweet as a base for a Banoffee Pancake Cake! Tartiflette is one of my all time favourite cold winter recipes, so is perfect as the nights draw in. It’s simply a case of frying off lardons and sliced onions, seasoning, parboiling chopped potatoes then browning with the lardons.

DSC_0201

Next, pour in a little cream, transfer to an ovenproof dish, top with Reblochon cheese and bake.

DSC_0206

For exact quantities, see below. When bubbling and brown, spoon over a hot pancake.

DSC_0211

DSC_0213

The Banoffee cake was more of an experiment, but perfect if you’ve forgotten to make a pudding, as I had, when friends arrive for dinner. I made this in approximately 5 minutes whilst chatting! Simply stack then heat your sweet pancakes in the microwave. Meanwhile, whisk some double cream and chop a couple of bananas. If you wanted, you could even use squirty cream for ease. When the pancakes are heated through, top with half a can of Carnation Caramel (they’ve heated and caramelised it for you already, so no tin boiling required!), sliced banana, whipped cream and a sprinkle of cocoa.

DSC_0225

The pancakes, especially since they have a delicious vanilla flavour, act as the perfect quick base for this easy pudding.

If I made the Tartiflette Pancakes again, I think I’d try an easier way. I’d fry off the onions and lardons and parboil the potatoes as before. Then, I’d use the pancakes to wrap the mixture (like making Enchiladas), including a slice of the Reblochon, and lay the rolled pancakes side by side in a dish. I’d pour over the cream, top with any leftover cheese and bake til the cream had thickened. I think this would cut out a step or two and be generally easier.

DSC_0217

You could even layer a pancake flat, top with the mixture, include a slice of cheese and lay another pancake, mixture, etc., as with a lasagne, then pour the cream over and bake.

Although the pancakes seemed quite stiff when removed from the packet, once heated, they were a nice texture. And I particularly enjoyed the sugariness of the sweet ones, even simply melting some chocolate and pouring on top for one quick treat!

Tartiflette: Serves 3/4

1 pack Abra-ca-Debora original Dutch pancakes

200g smoked lardons

1 large onion, sliced

150mls single cream

3/4 medium sized potatoes, peeled and cubed

1 Reblochon

Banoffee Pie: Serves 6

1 pack Abra-ca-Debora sweet Dutch pancakes

150ml double / whipping cream

1/2 small tin Carnation Caramel

2 bananas

Cocoa

Disclaimer: Although I was sent products to try for the purpose of this post, all views and opinions are entirely my own, truthful and honest.

Wednesday, 14 November 2012

Dining in the Dark @ The Living Room W1

If someone asked you to Dine in the Dark, would you?

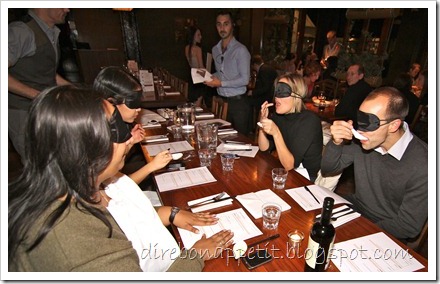
This is something I’ve always wanted to do, and I was lucky enough to have recently been invited to participate in an event at The Living Room W1. Thankfully, it didn’t involve a darkened room, or deep purple velour curtains to block the light (as I worried it might!), but a table of fellow food bloggers in a lively restaurant, each having been assigned their own blindfold and quiz sheet. 

Myself and the OH, @kaveyf, @wl_living and @candidsbyjo sat happily in The Living Room, W1 on Heddon St, London. I’ve never been to a ‘Living Room’ before, but was surprised with the buzz for a Thursday evening. A little worried about what other diners might think about a group of people donning blindfolds to eat our food, we double-checked the rules, were given our instructions and began the tasting challenge. Now, I’ve always thought that my senses of smell and taste were very good, but having a blindfold on, and no menu to double-check ingredients, makes it so much harder than first thought!
IMG_9743

We worked our way through the new menu, from starters to cocktails! Most of the tasters were served on sticks or on Chinese spoons which were kindly guided to our mouths if necessary. (That’s something else…try feeding yourself whilst blindfolded!)  Questions ranged from guessing the spices, to the main ingredient, or even the flavour of the accompaniment. I found myself using my sense of touch an awful lot more than usual, picking the spoons and stick apart and tasting each individual piece flavour by flavour.

IMG_9772

One of the first tastes was so familiar…on the tip of my tongue, so to speak. But it took until the very last minute for me to actually realise it was goat’s cheese. I know what you’re thinking…’But that’s such a recognisable taste’. And yes, you’re right, it is. But not when you’ve got no idea what’s coming up, the name of the dish, not when you haven’t chosen it from the menu, read the ingredients, or SEEN it! The question was to name the accompaniments to the Black Forest smoked cured ham. I was pleased to have managed, from the depths of my brain, to have identified two of the three: the goat’s cheese, eventually, and beetroot. There was no chance I was also going to decide upon the raspberry in the vinaigrette! The menu-speak for this delicious starter is ‘Black Forest smoked cured ham and fig, with a goats cheese mousse and raspberry and beetroot vinaigrette’. All I know is that it was yummy!

IMG_9757

I can’t possibly name all the little taster spoons we had, but I’ll pick out a few highlights for you:

The ‘Toulouse sausage in a spicy tomato, fennel, green pepper and paprika sauce on ciabatta’ was a tasty mouthful where I felt the flavours all combined well. It was also one of the easier challenges, with such strong flavours and I managed to find the fennel and paprika on this one. I’m also a sucker for a burger if we go out to eat, and the ‘Pork and chorizo burger with a smoked paprika aioli on a brioche bun’ was another favourite of mine. If you’re having a steak, I’d definitely recommend one of the flavoured butters to add a little something extra. The Blue cheese and port is particularly strong and thick, the garlic and parsley does what it says and the more unusual Bloody Mary has a good tomatoey flavour.

One of the ingredients most of us failed to identify at all, was the plum in the Duck breast with szechuan pepper and plum chutney, chilli fried bok choi and sweet potato fondant. There really didn’t seem to be any plummy flavour there at all. Maybe with a bigger portion size, it would be more recognisable. Lastly, I’d definitely recommend the Living Room’s version of Shepherd's Pie. Now, you probably already know that the name means the meat should be lamb, a Cottage Pie, however, would normally be beef. We were asked to identify the meat in this version. I plumped for lamb, mainly based on the name rather than the flavour, and the fact I though the taste was quite rich and a little bit greasy (which I like in a pie!) It was, in fact, Venison, and was also excellent. I’d definitely be ordering this if I visited again.

IMG_9853

We were lucky enough to taste five of the cheeses on offer: Stilton, Cheddar, Brie, Edam and Manchego and also a range of cocktails. After, of course, a small sample of puddings! The Basil Grande was very unusual, with a mix of basil, meringue, Grand Marnier, strawberries and cream, and absolutely divine!

So, we come to the end, even though I don’t think any of us achieved more than half marks! Our well-deserved winner was @wl_living with a clear lead. She even got to take home the trophy. Congratulations! ( I came second, and there was no hope of me catching the leader, even if I’d been braver with some of my answers!)

IMG_9884

Would I recommend the new menu? Definitely. But I’d also recommend you take a blindfold, order a small selection each without telling the other, and try the Dining in the Dark challenge for yourself!

Thanks to Kat for organising. If you’d like to find out about other events, why not follow #tlrblindsupperparty on Twitter?

Friday, 9 November 2012

Merlotti vs. Domino’s … Part Two

DSC_0067Some of you may remember, many years ago I took on Dominos to compare their new range of pizzas to my own. I was contacted recently to do this again, as Dominos have just released a Gourmet Specials range, including the Firenze, Florentine and Rustica pizzas. These are prepared on their Italian style base with a sundried tomato and garlic topping and various other additions, from spicy salami and pepperoni, to baby spinach, feta cheese and Roquito peppers.

DSC_0062

For my part, I chose to cook one large pizza and split the toppings into three sections, one for each of the above. I made my own garlic and tomato sauce and used a mozzarella over the whole pizza, this time choosing a base from Phil Vickery’s Pizza Masterclass, which (I have to admit) was better than my Gino version. 

So, I went to the Domino’s site to order pizza online and chose one of each, a delivery time of 8pm and a free tub of Ben and Jerry’s! Now, I would say I sat back and waited, but in the meantime, I took my proved dough, rolled out, prepared the toppings and waited til ten to eight to top and bake, not wanting the base to go soggy. However, the Dominos then arrived, so I quickly prepared and cooked mine to add to the collection!

DSC_0068

The first thing we noticed was that, apart from the Firenze, compared with mine, the Domino’s pizzas had fewer toppings, maybe just one of each item on every slice. And very little tomato and garlic paste. In fact, even when peeling back the layer of cheese, it was barely noticeable to look at, never mind to taste.To be fair, since I was cramming three pizzas into one, mine was heavily laden, but also had a good tasty layer of the tomato paste.

Let’s take the pizzas one by one: first the Firenze. Domino’s describe this as having Ventricina salami, pepperoni and Peruvian Roquito peppers on a fresh thin crust base. The salami and pepperoni were indeed very tasty, but we all found the sweetness of the peppers a little overpowering…do you really want a sweet pizza? Perhaps a change to a more savoury pepper might do the trick here.

DSC_0072

Secondly, the Florentine. This is topped with baby spinach, sunblush baby plum tomatoes and Greek Feta cheese. Now, for my comparison, I simply used halved cherry tomatoes, rather than the baby sunblush, which gave a superior taste. In fact, it seemed a bit pointless having a rich tomato and garlic sauce on mine, and then using more of the same tomatoes on top. Out of all the pizzas, this was definitely the nicest flavour combination.

The third pizza we tried was the Rustica, using toppings such as chicken breast strips, smoked bacon rashers, baby spinach and sunblush baby plum tomatoes. I couldn’t taste the smokiness of the bacon with this one, or the spinach, but again, the tomatoes were good.

My pizza, as mentioned, had a thick layer of the tomatoes, sporadic mozzarella, bundles of topping and a crispy and bubbling base! I could have precooked the salami and pepperoni to give it a slight crispiness, as I like this aspect of the Domino’s version: the meat on mine was a little ‘wilted’. Also, I was upset to find that the middle of the pizza had the infamous ‘soggy bottom’; ‘not a good bake' as Paul Hollywood would say! The flavours, however, compensated for both of these!

DSC_0063

Usually, if I ever order a Domino’s, it’s because I fancy a deep pan Pepperoni, which I just can’t make at home. Sorry Domino’s, I should learn my lesson. For just a little effort, I feel that you can make the thin crusts easily and quickly, the results being more topping, richer flavours and a crispier base; it’s also certainly lighter on the wallet with a large Domino’s costing around £17. 

DSC_0070

So, all in all, my family (I promise, they weren’t being biased!) voted mine best for overall flavour, crispiness, bubbliness of base and price. The picture speaks for itself!

DSC_0071

Sunday, 28 October 2012

Halloween Cake Pops

DSC_0012

I was recently sent the Bakerella Cake Pops book for my birthday and couldn’t wait to get started on these little gems! If you’ve never heard of them before, don’t worry. I only recently found out about them and have been itching to try them since but needed the motivation to actually get going!

I’m not going to bother writing how to make them here, or the ingredients you need, as Holly (of GBBO fame) has done a much better job of this on her fab blog here. But everything is available now in the UK: things such as the candy melts are readily bought in hobbycraft, the tubs of frosting in Asda, etc. so sourcing of ‘the right stuff’ has become much easier since this idea caught on.

I began by making the cake mixture itself and leaving to set. I chose round pumpkins and frilly ghosts.

DSC_0004

Next I melted the candy and inserted the pop-sticks and left again to cool. I had big issues with the melts being far too thick, but since I began with the ghosts, this didn’t really matter as they could easily become wrinkly ghosts. The next day when I used the orange ones for the pumpkins, I put it in for much less time and stirred to help the remnants dissolve. This gave a far runnier liquid and smoother finish to the pumpkins though I still found it incredibly difficult to achieve a smoothness all over, without any of the thicker drips. Having researched this, many people seem to use Trex to thin the melts, or you could just as easily use a little vegetable oil to do the trick. I think the key to it is probably practise and slightly smaller pops.

DSC_0005

I had also bought an edible pen with which to draw on the faces, but this proved disastrous as the pen just would not work on the dried melts. I think it’s more meant to be used on rice paper and actual icing, rather than a chocolate-type substitute. I ended up using a tube of writing icing, but couldn’t be as precise as I’d have liked with this. Next time, I’ll just stick to decoration with ready made bits and pieces, in fact, I’ve already bought some Christmassy ones and decided to coat them with chocolate rather than candy melts.  

DSC_0008

Related Posts Plugin for WordPress, Blogger...
Creative Commons License
This work is licenced under a Creative Commons Licence.